Script to get VMName, Installed vmtools version, ToolsStatus, ToolsRunningStatus, PowerState, details and export to .csv or send over mail


PowerShell script to generate VMTool status report

Open Windows PowerShell ISE and run below command to save user ID and password in encrypted file.

$credential = Get-Credential

$credential.Password | ConvertFrom-SecureString | Set-Content c:\temp\password2.txt


now you will see one .txt file has created at below path

c:\temp\password2.txt

Run below command to check vCenter connectivity

Connect-VIServer -server vc6.ads.com -Credential $credential


Run below command to generate report and export at some location

$report = Get-VM | Get-View | Select-Object @{N=”VM Name”;E={$_.Name}},@{Name=”VMware Tools”;E={$_.Guest.ToolsStatus}} | Export-CSV c:\temp\VMwareToolsStatus.csv


Now you will see one file has created at given path


Save below PSCommand in .ps1 file and run it to get VMTool report

$credential = Get-Credential

$credential.Password | ConvertFrom-SecureString | Set-Content c:\temp\password1.txt

Connect-VIServer -server vc6.ads.com -Credential $credential

#$credential =Get-VICredentialStoreItem -File "C:\temp\password1.txt"

#$credential = Get-VICredentialStoreItem -file C:\temp\password1.xml

$report = Get-VM | Get-View | Select-Object @{N=”VM Name”;E={$_.Name}},@{Name=”VMware Tools”;E={$_.Guest.ToolsStatus}} | Export-CSV c:\temp\VMwareToolsStatus3.csv


Script to get VMName, Installed vmtools version, ToolsStatus, ToolsRunningStatus, PowerState, details and export to .csv or send over mail 

$credential = Get-Credential
$credential.Password | ConvertFrom-SecureString | Set-Content c:\temp\password1.txt
Connect-VIServer -server vc6.ads.com -Credential $credential
Get-VM | Select @{N=”VMName”; E={$_.Name}},@{N=”HardwareVersion”; E={$_.Extensiondata.Config.Version}},@{N=”ToolsVersion”; E={$_.Extensiondata.Config.Tools.ToolsVersion}},@{N=”ToolsStatus”; E={$_.Extensiondata.Summary.Guest.ToolsStatus}},@{N=”ToolsVersionStatus”; E={$_.Extensiondata.Summary.Guest.ToolsVersionStatus}},@{N=”ToolsRunningStatus”; E={$_.Extensiondata.Summary.Guest.ToolsRunningStatus}},PowerState | Export-CSV c:\temp\VMwareToolsStatus33.csv -NoTypeInformation -UseCulture

Send-MailMessage –From VMTool@domain.com –To raju.prasad01@domain.com –Subject “Guess what!” -Attachment "VMwareToolsStatus3.csv" –Body “I am Testing to get VMTool service status from PowerShell” -SmtpServer mail.ads.corp -UseSsl -Port 25

Error: Invalid server certificate when connecting with vCenter through PowerShell


Error: Invalid server certificate


PS C:\Users\Administrator> connect-viserver -server 192.168.1.50

connect-viserver : 6/30/2021 8:01:49 AM Connect-VIServer                Error: Invalid server certificate. Use

Set-PowerCLIConfiguration to set the value for the InvalidCertificateAction option to Prompt if you'd like to connect

once or to add a permanent exception for this server.

Additional Information: Could not establish trust relationship for the SSL/TLS secure channel with authority

'192.168.1.50'.

At line:1 char:1

+ connect-viserver -server 192.168.1.50

+ ~~~~~~~~~~~~~~~~~~~~~~~~~~~~~~~~~~~~~

    + CategoryInfo          : SecurityError: (:) [Connect-VIServer], ViSecurityNegotiationException

    + FullyQualifiedErrorId : Client20_ConnectivityServiceImpl_Reconnect_CertificateError,VMware.VimAutomation.ViCore.

   Cmdlets.Commands.ConnectVIServer


Run below command to by pass invalid Certificate

PS C:\Users\Administrator> Set-PowerCLIConfiguration -InvalidCertificateAction Ignore -Confirm:$true


Perform operation?

Performing operation 'Update PowerCLI configuration.'?

[Y] Yes  [A] Yes to All  [N] No  [L] No to All  [S] Suspend  [?] Help (default is "Y"): y


Scope    ProxyPolicy     DefaultVIServerMode InvalidCertificateAction  DisplayDeprecationWarnings WebOperationTimeout

                                                                                                  Seconds

-----    -----------     ------------------- ------------------------  -------------------------- -------------------

Session  UseSystemProxy  Multiple            Ignore                    True                       300

User                     Multiple            Ignore

AllUsers


Again run command to connect with vCenter

PS C:\Users\Administrator> connect-viserver -server 192.168.1.50


Name                           Port  User

----                           ----  ----

192.168.1.50                   443   VSPHERE.LOCAL\Administrator


Create CIFS and NFS enabled volume in NetApp


Open browser enter cluster management IP

Enter user ID -:  Admin

Enter password-: ******


First step to add license for enable services if license won’t be there you can’t start services

After login to console click on configuration

licenses > Add


Add licenses one by one from license file


Expend applications tier -> Click add Aggregate


Click on manually create Aggregate

Give Name

and select number of Disks

Now new Aggregation disk group has created.


Expend storage -> SVMs -> type SVM Name and check mark on services

Select security type

Select Aggregate level


Click submit and continue

In assign IP address tab -> select without a subnet

Assign IP address


In assign IP address tab -> select without a subnet

Assign IP address

Give Server Name

Share Name

Active Directory 

Assign Size

Assign Physical interface to travel the traffic


SVM Name:CIFS

IPspace:

Default

Volume Type:

FlexVol volumes

Default Language:

C.UTF-8

Security Style:

NTFS

Root Aggregate:

NFS_Aggregatge

Search Domains:

ads.com

Name Servers:

192.168.1.12

Protocols Enabled:

CIFS, NFS, iSCSI

Bottom of Form

Top of Form

CIFS/NFS Configuration

CIFS and NFS Data LIF:

Success

Subnet:

-NA-

IP Address:

192.168.1.52

Netmask:

255.255.255.0

Route Details:

Route created

Gateway:

192.168.1.1

Destination:

0.0.0.0/0

Home Node:

NetApp_Clue-01

Home Port:

e0a

CIFS Server Creation:

Failed

ONTAP API Failed: Failed to create the Active Directory machine account "CIFS". Reason: SecD Error: no server available Details: Error: Machine account creation procedure failed [ 512] Loaded the preliminary configuration. [ 649] Created a machine account in the domain [ 670] Successfully connected to ip 192.168.1.12, port 445 using TCP [ 676] Encountered NT error (NT_STATUS_MORE_PROCESSING_REQUIRED) for SMB command SessionSetup [ 677] Cluster and Domain Controller times differ by more than the configured clock skew (KRB5KRB_AP_ERR_SKEW) [ 677] Kerberos authentication failed with result: 7537. [ 679] Encountered NT error (NT_STATUS_MORE_PROCESSING_REQUIRED) for SMB command SessionSetup [ 679] Cluster and Domain Controller times differ by more than the configured clock skew (KRB5KRB_AP_ERR_SKEW) [ 679] Kerberos authentication failed with result: 7537. [ 681] Unable to connect to LSA service on srv12.ads.com (Error: RESULT_ERROR_KERBEROS_SKEW) [ 681] No servers available for MS_LSA, vserver: 2, domain: ads.com. **[ 681] FAILURE: Unable to make a connection (LSA:ADS.COM), ** result: 6940 [ 683] Could not find Windows SID 'S-1-5-21-876682103-3312334367-2603367056-512' [ 691] Deleted existing account 'CN=CIFS,CN=Computers,DC=ads,DC=com' .


NFS Service:

Started

NIS Domain Creation:

Skipped


Bottom of Form

Top of Form

iSCSI Configuration

iSCSI protocol is not configured for this SVM.

Bottom of Form

Top of Form

SVM Administration

Administrator Password Modified


Subnet:

-NA-

IP Address:

192.168.1.54

Netmask:

255.255.255.0

Home Node:

NetApp_Clue-01

Home Port:

e0b

Route Details:

Route already exists

Gateway:

192.168.1.1

Destination:

0.0.0.0/0

Bottom of Form

If you want to manage permissions for SVM peering, navigate to

Manage Peering Permissions

page.


Citrix XenApp 6.5 Installation and configuration step by step

 Open XenApp 6.5 setup folder >select Auto-run press enter

Click on Install XenApp Server


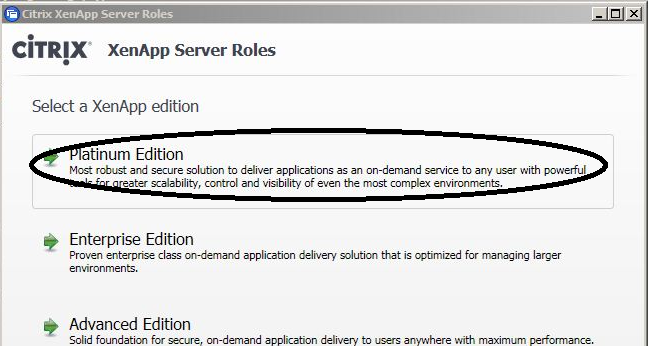
Click on Add server Roles


Click on Platinum Edition>

Accept license agreement > next

Select common Roles
License Server
XenApp
Web Interface

Click Next

Click on XML Service IIS Integration

Click Next


Click Next> Install

Click on Install


Click Finish>
Note -:your system will reboot and after reboot setup will auto resume.

Click on Resume installation


Note-: Once the setup will complete you will see below screen


Click on Web interface configuration


Right click on XenApp Website>Click on Create Site


Enter Farm Name
Click on Add and enter your server Name here


Select Authentication type that you want to apply for your XenApp users.


Select Allow any domain>next


Select full screen appearance


Click on Finish button


License Server configuration

Start>citrix>Management Consoles>License Administration Console


Click on Administrator
User ID-: enter user Name
Password-: enter password


Click on Vendor Daemon 

Click on Import License

Click on Browse and and define the license file(.lic) path.


Click >Ok

How to configure License server Name


Enter License server Name this name should be your computer Host Name


Click on Test connection>close>next


Enter login credentials>ok


Select Allow shadowing of user session if you want


Enter Zone Name if you want to or leave it default Zone>
XML Service>             you can change port number if you want
Receiver >                   Assign receiver path for access Applications or Desktop.
Remote Desktop user>Assign access to user who can access or not.


Click Apply


Click on Finish and let the server reboot if server does't reboot.

Click on Reboot>

How to configure AppCenter  on XenApp server for map application

Start>citrix>Management Consoles> Cirtix AppCenter>


Click >Next


Select XenApp


Click on Add Local Computer

Click on Add>Select server Name here form the list


Once Discovery will complete a successfully Discovery completed message will display on the screen


How to publish Application on XenApp server

Open Citrix AppCenter>


R.C on Application>Publish Application


In Display Name type the Application Name


Select installed Application>Next


Click on Browse>Next


Click on Add>Select Server>Select server Name


Click Add>Ok


Click Add  and select server Name.


Click users
Select Allow anonymous users(If you want to give access to every one)
Select Allow only configured users(If you want to assign access to user separately)


Click on Select Users from list


Click on change Icon if you want.


Now Click on finished


Now finally Notepad has been published on Citrix XenApp.

How to Open this published application if you are on server side

Now open IIS >XenApp


Click on Browse


Now Click on Notepad


Enter User Name
Enter Password


Featured Post

HPE MSA 2040 configuration step by step

HPE MSA 2040 configuration Default IP range for HP SAN storage MSA 2040 is 10.0.0.1/2 You need to connect your laptop and storage with...