Replace vCenter 7.0 Machine Certificate with Internal SSL certificate using vCenter Web Console

 How to replace machine certificate with Internal SSL certificate using vCenter web console

This article is to replace Machine SSL certificate of vCenter 7.0

Login to certificate server 

Open PowerShell and run below command, you need to replace with your vCenter FQDN

Get-Certificate -Template WebServerCustom -SubjectName "CN =DEMOVCSA.vsphere.com,OU = International SOS,O = International SOS,L = Singapore,S = SG,C = SG" -DnsName DEMOVCSA.vsphere.com, DEMOVCSA -CertStoreLocation cert:\LocalMachine\My


MMC-> this computer -> Certificate

Expand the personal certificate folder -> you will see Certificates with the same name have already been created.

Export -> 


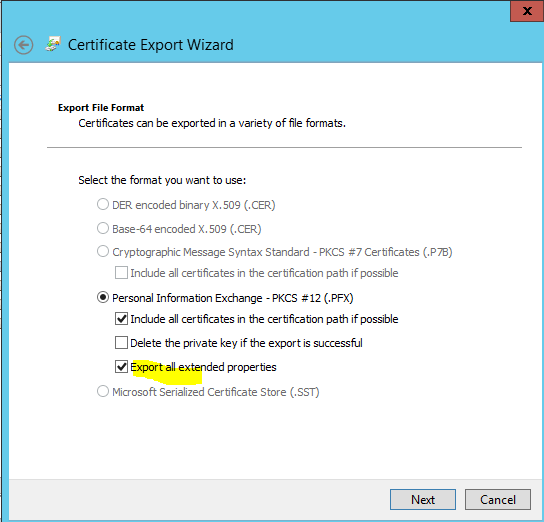
Make sure you have selected Export all extended properties


Enter the password


Go to the path where you have exported .pfx file

Now open Win32 OpenSSL command prompt with Administrator privilege


Run Below command after replacing file name


openssl pkcs12 -in C:\Certificate\server\DEMOVCSA.pfx -nocerts -out C:\Certificate\server\DEMOVCSA.key.pem -nodes


Password: Temp@123


openssl pkcs12 -in C:\Certificate\server\DEMOVCSA.pfx -nokeys -out C:\Certificate\server\DEMOVCSA.pem


Now two files will export at given path -> C:\Certificate\server\


DEMOVCSA.key.pem

DEMOVCSA.pem


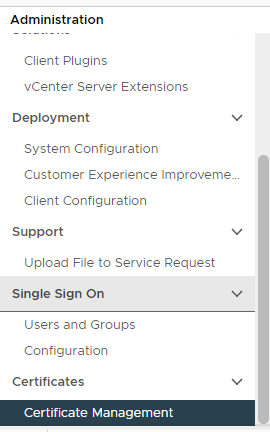
Now login to vCenter with global permission account


Click on Menu -> Administrator

Under Certificate click Certificate Management


Now go to Machine_Cert -> Actions

Click Import and Replace Certificate


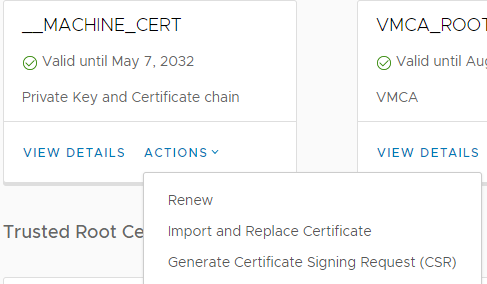
 Select Relace with external CA Certificates Private Key
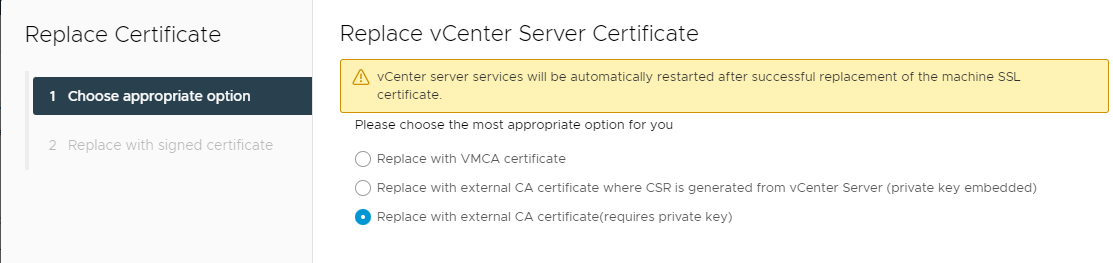


Click Next


Open VCSADEMO.Pem file in notepad from C:\Certificate\server\

Copy -----BEGIN CERTIFICATE----- to -----END CERTIFICATE----- and paste


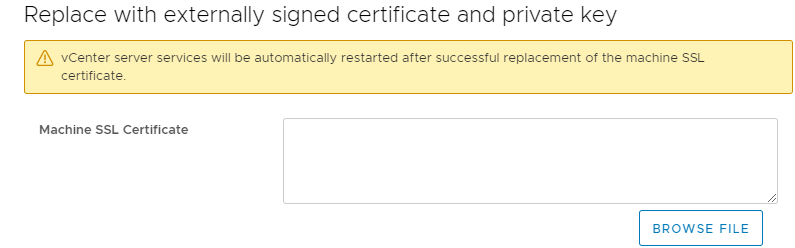
Copy second Key and paste in 


Now open another file sin1vsyvvc001.key in Notepad and paste it in


Then click Replace


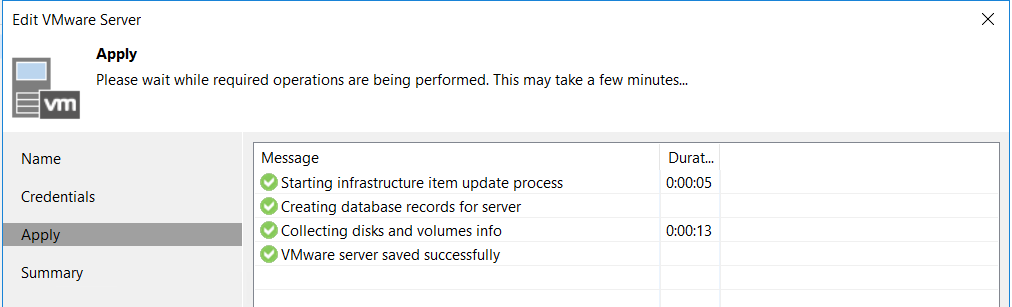
Now you will see the message certificate import completed successfully and you will be asked to re-login


It will take some time in bringing up the service

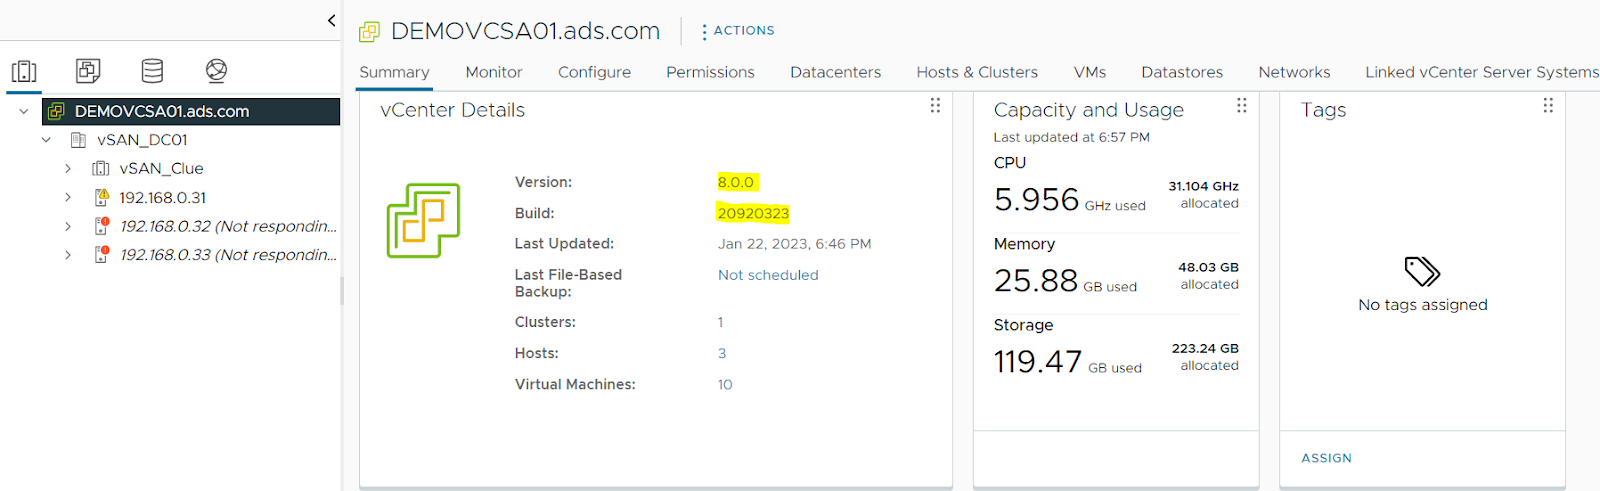
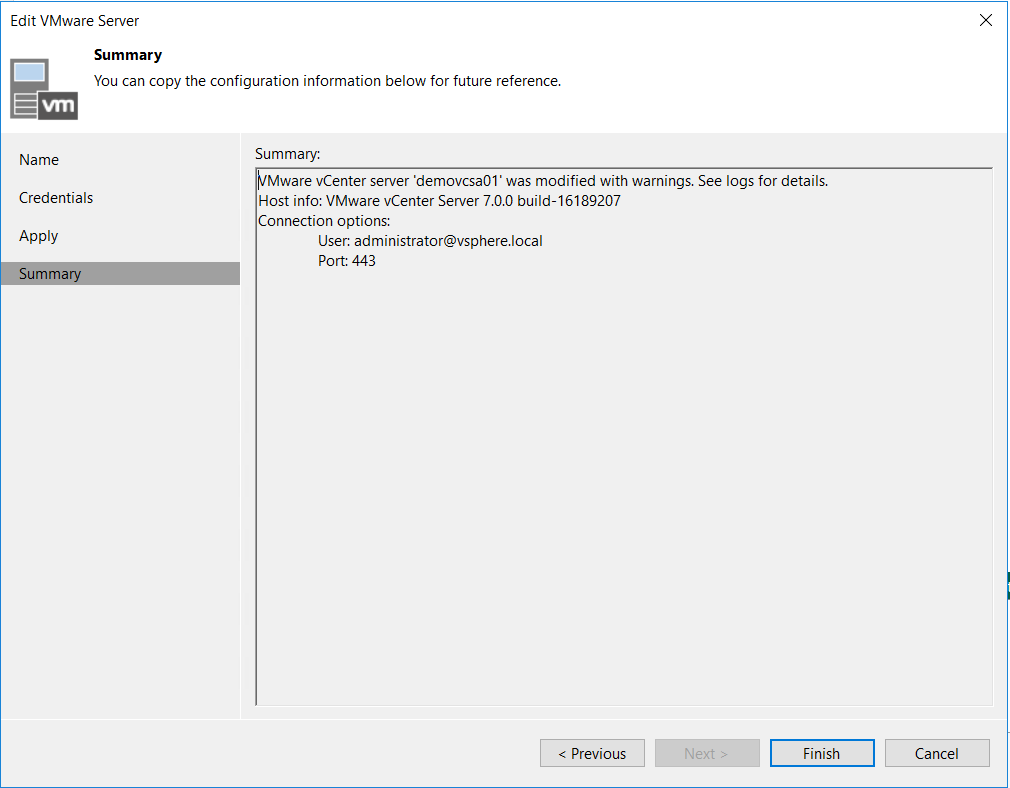
Once the service is up you need to open the vCenter web console and from there you can see certificate status, now it should show a trusted certificate.


vCenter Server upgrade from 7.0U3 to 8.0 step by step

 Step by step to upgrade vCenter 7.0U3 to vCenter 8.0

Download VMware-VCSA-all-8.0.0-20920323.iso file

Mount it to any Jump host from where existing vCenter and ESXI host is reachable.

Go to E:\vcsa-ui-installer\win32 

And Launch Installer.exe


Click on Upgrade


Click Next


Accept license and click Next


Enter Source vCenter details 

HTTPS port 443

SSO User name

SSO Password

Appliance root password

Enter ESXI host details that manage the existing vCenter

Click Next


Click Yes to accept the Certificate

Enter target ESXI host details where you want to deploy new vCenter

In my case I am deploying new vCenter on same ESXI host where my existing vCenter is deployed

Click Yes to accept certificate

Give the VM name (New vCenter inventory Name)


Select Deployment size as per infra setup. 

Click Next


Select the datastore and Enable Thin disk mode

Click next


Enter temporary IP address, Subnet and Gateway

Click Next


Click finish to start deployment


Stage 1 has started; once stage 1 will complete stage 2 will start

Stage 1 has completed; now click continue to start stage 2


Click next


Pre-upgrade checks are in progress


During pre-upgrade check if anything will not match it will throw error here and you need to fix it before process it forward. 

In my case it is just giving warning that can be easily ignore.


Select the upgrade data -> Next


Click Next


Check mark on I have backed up the source vCenter server and click Finish


Click OK


Now Stage 2: Data transfer has started and final setup is in progress.


Now existing vCenter has powered off and final configuration has started


Now importing copied data to target vCenter server.


Final data migration completed.

Click on vCenter Server getting started page: link to launch the console


Veeam backup & Replication 11 installation | Repository add |vCenter Add in Veeam Backup

 Veeam backup & Replication 11 installation | Repository add |vCenter Add in Veeam Backup 

Download the setup file

Double click on setup.exe

Click Install

Note-: If you want to install these component standalone then click standalone components 


Click Ok to install prerequisites in case you have not already installed.


Post installation prerequisites it will prompt for reboot.


Accept the license term and condition.

Browse license file -> Next

Select the product and change the installation path


Install the minimum requirements

Enabling missing features

Now prerequisites have been installed

Assign Write cache folder and Guest catalog folder path to different drive like below

V:\programData\Veeam\backup\folder name where you have to keep

V:\VBRCatalog


Write cache path will be used when you will perform VM recovery.


Use the service account


By default Veeam will install express edition on this machine if you want to choose existing then change the option and give the database server name.

If you are using express edition then size will be 10GB so if you are planning to take Exchange or SharePoint backup then always plan to use Enterprise or standard edition.


Specify the port number if you want to use custom or keep it default


Click on Install to start installation.

Click Finish

Now launch Veeam Backup and Replication


Click Connect


Add repository in Veeam Backup and Replication

Connect to Veeam Backup & Replication

Click Backup Infrastructure from left side bottom


Select Backup Repository

Click Add Repository

Click Direct Attached storage

Microsoft Windows


Name: Enter Repository Name

Select server from list if you want to add another server else click next

Browse the path and select the drive and folder where you want to keep backup file


Now I formatted disk in ReFS volume 

Cross check the write cache folder that will be required when you will restore VM


Now Backup repository has been added 


Add vCenter server in Veeam


Click next

Add and enter vCenter server login details

Click Ok


Click Apply


Click next


Now all VMs are reflecting under the vCenter server .


Featured Post

HPE MSA 2040 configuration step by step

HPE MSA 2040 configuration Default IP range for HP SAN storage MSA 2040 is 10.0.0.1/2 You need to connect your laptop and storage with...