Get-Certificate: CertEnroll::CX509Enrollment::Enroll: Error Parsing Request The request subject name is invalid or too long. 0x80094001

 Get-Certificate: CertEnroll::CX509Enrollment::Enroll: Error Parsing Request  The request subject name is invalid or too long. 0x80094001 (-2146877439 CERTSRV_E_BAD_REQUESTSUBJECT) The request ID is 1109849. A certificate could not be issued by the certification authority.: The request subject name is invalid or too long. 0x80094001 (-2146877439 CERTSRV_E_BAD_REQUESTSUBJECT). This may be the result of user credentials being required on the remote machine. See Enable-WSManCredSSP Cmdlet help on how to enable and use CredSSP for delegation with PowerShell remoting.


When you are getting error The request subject name is invalid or too long. 0x80094001 make sure you are not using more than two characters for C= 

Get-Certificate -Template WebServerCustom -SubjectName "CN =DEMOVC002.ads.com,OU = DEMO,O = DEMO,L = Dubai,S = IND,C = DE" -DnsName DEMOVC002.ads.com, DEMOVC002 -CertStoreLocation cert:\LocalMachine\My

Access is denied. (Exception from HRESULT: 0x80070005 (E_ACCESSDENIED))

 If you are getting below error while adding node or connecting node in existing cluster .

Access is denied. (Exception from HRESULT: 0x80070005 (E_ACCESSDENIED))


Solution -: Make sure you have installed all latest patches in node before adding to the cluster.

In-Place Upgrade failed with error 0x8007042B - 0x4000D


If you  see error code 0x8007042B - 0x4000D at 82-83% during In-Place upgrade from 2012 R2 to windows server 2016 or 2019.

Make sure, you have enough space in  C drive, always keep C drive space around 100GB free space before going for In-Place Upgrade.


VMware vRealize Orchestrator | Aria Automation Installation and known issue troubleshooting | LCMVRAVACONFIG590003

Aria Automation Installation failing at Initialize vRealize Automation cluster with below error.

Issue – Error Code: LCMVRAVACONFIG590003

Cluster initialization failed on vRA.
vRA va initialize failed on : xxxx-xxxx-xxxx, 
Please login to the vRA and check /var/log/deploy.log file for more
information on failure. If its a vRA HA and to reset the load balancer,
set the ‘isLBRetry’ to ‘true’ and enter a valid load balancer hostname.


Default root password of  VMware vRealize Orchestrator Appliance is vmware

passwd -x 99999 root


  1. Log into the Appliance with SSH.

  2. Navigate to /opt/charts/vco/templates/

  3. Copy/Backup the deployment.yaml file using the command:

cp deployment.yaml /tmp/


  1. Edit the deployment.yaml file using your preferred editor (vi deployment.yaml).

  1. Locate the string:  init_run.sh

  2. Replace the text as follows.

Search for row that contains this text: init_run.sh:

command:

- "/bin/bash"

- "-c"

- "/init_run.sh"

Edit this row by just adding these two "sed" commands before /init_run.sh script. The row after editing should looks similar to this::
command:

- "/bin/bash"

- "-c"

- "sed -i 's/root:.*/root:x:18135:0:99999:7:::/g' /etc/shadow && sed -i

's/vco:.*/vco:x:18135:0:99999:7:::/g' /etc/shadow && /init_run.sh"


  1. Save the file

If you are deploying outside of vRealize Suite Lifecycle Manager, follow these steps:

  1. Navigate to /opt/scripts/

  1. Execute the script: ./deploy.sh


If you are deploying through vRealize Suite Lifecycle Manager, follow these steps:

  1. Log back into Lifecycle Manager and 'Retry' the deployment that failed.  

  2. Installation should now progress as expected.


  1. Now configuration has completed


  1. Open below url 

https://demovro.ads.com/vco 


Click on Control Center

Login with root credential


Click Validate configuration


Validation completed successfully.


Now click configuration Authentication Provider


From drop down select vSphere

And enter vSphere details


Accept certificate and click save change


Click Register


Select default tenant and admin group


Click Save Changes


Now open vRealize orchestrator link 


https://demovro.ads.com/vco


Click start the Orchestrator client


And login with vSphere account that we have added in tenant.


Click Workflows

In search box type -> Add a vCenter Server Instance


Click Run and enter vCenter details that you want to add


Click user ID and password


Click on Additional Endpoints


vCenter -> Configuration -> click on Register vCenter Orchestrator


Click Run


Enter vCenter details and click Run


Error Aria | Error Code: LCMVRAVACONFIG590003

 Error Code: LCMVRAVACONFIG590003


Cluster initialization failed on VMware Aria Automation.
VMware Aria Automation virtual appliance initialization failed on AriaPrn.ads.com. Login to VMware Aria Automation and check /var/log/deploy.log file for more information about the failure. If it is a VMware Aria Automation high availability and the load balancer has to be reset, set the 'isLBRetry' to 'true' and enter a valid load balancer hostname.

Error Source vCenter Server has unsupported version of host profiles

 Issue -: If you are getting below error during vCenter upgrade pre-check.


Error Source vCenter Server has unsupported version of host profiles

Host profiles with versions lower than 6.7 are not supported by vCenter Server 8.0.0 Upgrade the 1 host profiles listed below to version 6.7 or later before proceeding with the upgrade of vCenter server upgrade the host profile before upgrading all hosts with versions lower than 6.7 for more information see KB52932 list of unsupported host profiles.


Solution -: You need to check Host profile created in vCenter and delete unsupported Host profiles.


Failed to send http data” while installing vRealize Easy Installer


If you are seeing below error while vRealize Aria Suit using vRealize Easy Installer

Error “Failed to send http data” while installing vRealize Easy Installer


A general system error occurred:  PBM error occurred during PreCreateCheckCallback: HTTP error response: Service Unavailable


 PBM error occurred during PreCreateCheckCallback: HTTP error response: Service Unavailable


Solution -:

1. Make sure VMware vSphere Profile-Driven Storage Service is running.

2. Make Sure ESXI host and vCenter FQDN is resolving with name and IP


Steps to Upgrade VxRail vCenter.

Before starting VxRail infra upgrade you need to go with pre-validation test using vCenter and command line using VxRail Manager.


Please take some time to review the Customer Preparation Guide KB:
https://www.dell.com/support/kbdoc/en-us/000200768 

 Recommendation:

VxRail Engineering performed a data analysis, which has shown that 92% of upgrades complete with no issue when the ESXi nodes are proactively rebooted. This will identify VM's with potential vMotion issues, ESXi maintenance mode issues, reboot issues and refreshes all ESXi services.  

Therefore, RPS are recommending customers to perform a rolling reboot on the ESXi nodes, several days before the VxRail Upgrade (Customer Task).

If a customer has any issues during the reboots, they can open an SR with the VxRail Support team to address an issue.
Additionally, your Upgrade Engineer will also reboot all Service VM's (VxRail Manager, vCenter** & PSC**) and reset iDRAC on all nodes prior to starting the upgrade.
**Only if VxRail Managed. 


 1.      Run Skyline Health

Login to Vxrail vCenter -> Cluster -> Monitor

Under the vSAN Run Skyline


2. Check Resyncing Objects

Login to VxRail vCenter -> Cluster -> Monitor

Under the vSAN -> Resyncing Objects

If all object has already resync then it’s fine if not, then run the Resync from Configuration.


3.      Change VxRail cluster heartbeat duration to repair Object, default it is set to 60 Minutes.

Change it to 300Minutes or more to avoid object sync during node isolation.


Login to VxRail vCenter -> Cluster -> Configuration

Under the vSAN -> Service -> Advanced Option

Click Edit and set Object repair timer.


4.      Enable VxRail health Monitoring.


Login to VxRail vCenter using root credentials and below command to check health status.

Command -> vsan.whatif_host_failures 0


Download vxverify_XXX_XX_XXX.phy file


Open vxverify_XXX_XXX_XX file using phython


Once you will run this command, VxRail manager will start collecting health report like below.


 In preparation for your upcoming upgrade event, note the below known items:

Schedule the upgrade for a time outside of your peak I/O load, as performance degradation may occur during the migration of VMs while individual nodes or hosts are being upgraded.

Since VMs are vMotioned as part of the upgrade, ensure that VMs are available to be vMotioned in advance. Examples of issues which may prevent vMotion:

VM with an ISO mounted.

VM with external storage locally mounted

VM pinned to a host (Affinity rules)


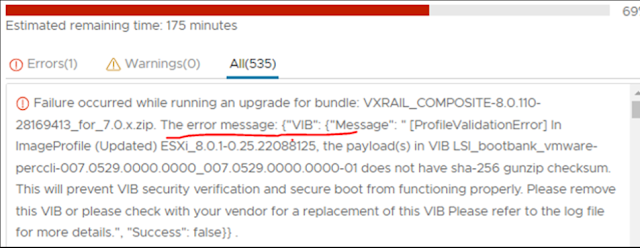
Download the latest ISO from dell portal for VxRail upgrade.


https://dl.dell.com/downloads/PG9N6_VxRail-8.0.110-Composite-Upgrade-Package-for-7.0.x.zip


Mount the ISO in VxRail cluster

Login to vCenter -> Select Cluster -> Configuration

Under VxRail -> Updates -> Local Updates 

Select Update Bundle and Upload


Once ISO Image upload complete click start.

Once you click start it will go with Precheck -> Scan and then Update.

Now all the tasks will complete auto. first will upgrade vCenter -> ESXI host.

It will prompt to enter Temp IP that will be assign temporarily to vCenter during upgrade. 


ESXI host upgrade failing with error the VIB cannot be satisfied within the ImageProfile | Missing_Dependency_VIBs_error

When upgrading the ESXI host from 6.7 to 7.0 or 8.0 it is failing with error the VIB cannot be satisfied within the ImageProfile


VIB Dell_bootbank_dell-configuration-vib

VIB qlc_bootbank_qedi

VIB DellEMC_bootbank_dellemc-osname-idrac

VIB QLogic_bootbank_net-qlge

dell-shared-perc8


You may perform below command to remove failed VIB.

Command -: esxcli software vib remove -n XXXXXXX(VIB name)

esxcli software vib remove -n dell-configuration-vib


esxcli software vib remove --vibname=vmware-perccli-007.0529.0000.0000_007.0529.0000.0000-01


Amazon S3 bucket Mount as Performance and Capacity Tier Storage Repository and Scale-Out Backup Repository.


Amazon S3 bucket Mount as Performance and Capacity Tier Storage Repository and Scale-Out Backup Repository


Login to Veeam Backup Server -> Backup Infrastructure


Click Add Repository


Click Object Storage


Click Amazon S3


Click Amazon S3


Give the Storage Repository Name -> Click Next


Account -: Click Add to enter Access key ID & Secret access key.

Connection Mode -: Direct


Click Next


Data Center -: Select the nearest Datacenter.

Bucket-: Type the Bucket Name that Amazon team have shared.

Folder-: Browse and create folder under Bucket.

Check mark on Make recent backups Immutable and set the date for the same.

Check mark on Use infrequent access storage class (May result in higher cost if you will use in 30day Infrequent)


Click Next

Mount Server: - Specify the mount server.

Change the Instant recovery write cache folder if needed or let it be on default setting.

Check mark on Enable vPower NFS service on the mount Server.


Click Next


Click Apply

Now S3 bucket has been mounted in Backup Repository.


Scale-Out Backup Repository-> We use SOBR to setup performance, Capacity and Archival Tier.


To Scale-Out Backup Repository.

Go to Backup Infrastructure -: Click Scale-Out Backup Repository


Give Scale-Out Backup Repository Name


Click Next


Performance Tier -> Click Add and select Primary Tier that you want to use as Performance Tier.


Click Next

Capacity Tier -: Check mark on Extend Scale-Out backup repository capacity with object storage.

Click Choose and select to second tier that you are going to use as capacity tier.


Note-: Based on your requirement you can set whether you want to copy or move your backup file to object storage or not.

1.       Check mark on Copy backups to object storage as soon as they are created.

2.       Move backups to object storage as they age out of the operation restore window.

3.       Encrypt data uploaded to object storage.


Click Next

Archive Tier -: Check mark on Archive GFS full backups to object storage.

Click add the Object storage that you are going to use as Archive Tier.

As this is POC environment so we are not going to keep backup data for so long time so not need to setup Archive Tier.


Click Apply and Finish.


Now Scale-Out Backup Repository has created.


Featured Post

HPE MSA 2040 configuration step by step

HPE MSA 2040 configuration Default IP range for HP SAN storage MSA 2040 is 10.0.0.1/2 You need to connect your laptop and storage with...