AD RMS enables you to protect your intellectual property through the integration of several features. In fact, in addition to a direct integration with Active Directory Domain Services (AD DS),AD RMS can also rely on both Active Directory Certificate Services (AD CS) and Active Directory Federation Services (AD FS).
AD CS can generate the public key infrastructure (PKI) certificates that AD RMS can embed in documents. AD FS extends your AD RMS policies beyond the firewall and supports the protection of your intellectual property among your business partners.
https://www.free-online-training-courses.com/active-directory-rights-management-services/
AD RMS Configuration step by step
1. Here I have three servers
1.0 Windows server 2K12R2 AD (FQDN:- srv.adds.com IP 192.168.1.13)
1.1 Windows server 2K12R2 ADRMS (Host Name:- NodeB.adds.com IP 192.168.1.16)
1.2 Windows server 2K12R2 Client (Host Name:- NodeA.adds.com IP 192.168.1.15)
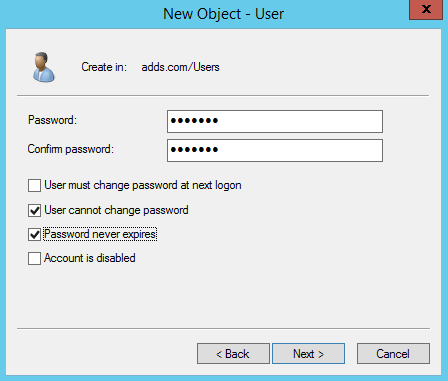
2. First step we need to create a service account and AD (ADRMSSRV) .
Open DSA.MSC
select user>R.C and select new user > Enter all details 

Set password and check mark on both user can't change password and password never expire
3. Second we need to create two groups in AD
Group name as below
a. ADRMS_Full
b. ADRMS_limited

Enter ADRMS_Full and click OK

Enter ADRMS_Limited and click OK

Next, add a few users to ADRMS_Full group, for this Demo I choose 4 of my Marketing users to join ADRMS_Full.
Select Group Name > R.C and click on members 
Enter Users Name to whom you want to add in member list and click on check names

Next, add few users to ADRMS_Limited group, for this Demo I choose 4 of my Marketing users to join ADRMS_Limited.
Select Group Name > R.C and click on members
and follow the steps as follow above

4. Fourth steps now we need to created Host (AA) record on same AD server and assign ADRMS SRV IP (NodeB.adds.com)
Name as below
ADRMS
Open DNS > R.C on domain name select New Host

Enter ADRMS name in Name field and IP address

Next, log in to NodeB.adds.com to start Install and configure the AD RMS server role
Open Server Manager, click Manage, and then click Add Roles and Features, in the Add Roles and Features Wizard, click Next 3 times
Then click Next 4 times
Next, click Install to proceed…
Click Close when installation successful
Next, on the All Servers Task Details page, click Perform Additional Configuration


Select create new ADRMS root cluster >Next

Select use windows internal database on this server

Specify new created service AD ID (ADRMSSRV)


Select Cryptographic mode

Select use ADRMS centrally managed key storage

Enter password


21 – On the Cluster Address box, provide the following information, and then click Next to proceed :
– Connection Type: Use an unencrypted connection (http://)
– Fully Qualified Domain Name: ADDS.COM
– Port: 80

On the Licensor Certificate box, type ADDS NodeB, and then click Next…


Click on install

Now the installation part has been completed.
Next, open Internet Information Services (IIS) Manager…

In Internet Information Services (IIS) Manager, expand Sites\Default Web Site and click _wmcs, then under /_wmcs Home, double-click Authentication

Then right-click Anonymous Authentication and click Enable…

In the Connections pane, expand _wmcs and click licensing and double-click Authentication

Right-click Anonymous Authentication and click Enable, then close IIS Manager…
Next, lets configure AD RMS ADRMS_Full group for NodeB
In Server Manager, click Tools, and then click Active Directory Rights Management Services…

In the Active Directory Rights Management Services console, expand the NodeB node, and then click Security Policies and click on change super user settings

Select Super users and click on enable super users
 ]
]
Now click on Change super users group > Type ADRMS_full@adds.com
Note :- there should be with email ID


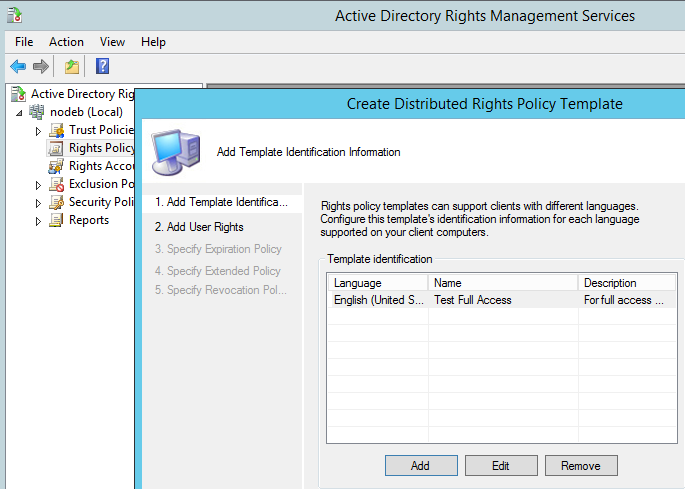
Open Active Directory Rights Management Services console, then click Rights Policy Templates node and then in the Actions pane, click Create Distributed Rights Policy Template

In the Create Distributed Rights Policy Template Wizard box, on the Add Template Identification information box, click Add
On the Add User Rights box, click Add, then on the Add User or Group page, type ADRMS_Limite


When ADRMS_Limited is selected, under Rights, click View. Verify that Grant owner (author) full control right with no expiration is selected, and then click Next…
– On the Specify Expiration Policy box, you can do settings and then click Next


On the Specify Extended Policy box, click Require a new use license every time content is consumed (disable client-side caching), click Next, and then click Finish.
Next step, lets configure the rights policy template distribution…
Now you need to create two folders in C:\
C:\RMSTemplates Full access to ADDS\ADRMSSRV
C:\DocShare Full access to ADDS\Everyone
On the ADRMS console, click the Rights Policy Templates node, and in the Distributed Rights Policy Templates area, click Change distributed rights policy templates file location, then in the Rights Policy Templates dialog box, click Enable Export…

Next, in the Specify Templates File Location (UNC), type \\NodeB\RMSTEMPLATES, and then click OK
Next, open Windows Explorer and navigate to the C:\rmstemplates folder, and verify that Test Full Access.xml is present

Next, on the ADRMS Console, click the Exclusion Policies node, and then click Manage application exclusion list

Actions pane, click Enable Application Exclusion…

Now All Done wait for next part