Connect NetApp cluster IP using Putty.

Enter user name and password


Connect NetApp cluster IP using Putty.
 SME VMware and Window | VMware | VxRail | vSAN | SRM | vRO | vROP|VMware Aria Log Insight| Nutanix |Cisco HyperFlex | NetApp | Azure | Citrix | Veeam Backup & Replication, EM & One
CRITICAL: This node is not healthy because the root volume is low on space
(<10MB).
The node can still serve data, but it cannot participate in cluster
operations
until this situation is rectified. Free space using the nodeshell or
contact technical support for assistance.
To fix root volume low space error on NetApp ONTAP you can delete created Snapshot on root volume using below command
cluster> node run local
node> snap delete -a vol0
node> vol options vol0 nosnap on
node> ctrl+D
cluster> reboot

Enter below command to delete Snapshot-:
snap delete -a vol0


Enter below command to set no Snapshot on Volume -:
vol options vol0 nosnap on
Press CTRL+D
Type reboot and press enter to reboot the NetApp ONTAP

Once NetApp ONTAP will come up post reboot login with Admin and check the status.
Error message should disappear from console.
 SME VMware and Window | VMware | VxRail | vSAN | SRM | vRO | vROP|VMware Aria Log Insight| Nutanix |Cisco HyperFlex | NetApp | Azure | Citrix | Veeam Backup & Replication, EM & One
The Storage Virtual Machine (SVM) does not have any data LIF configured for CIFS protocol. Create data LIFs before configuring the CIFS server.]
If you are getting above error while enabling protocol on SVM you need to create LIF.
How to create LIF in NetApp using GUI
Login to NetApp ONTAP using cluster IP.
Click on Network -> Network Interface
Click create

Give Name for LIF
Select interface role -> Here I am selecting for serves data
Select SVM for that you want to create LIF. One LIF can be use for one SVM
Select protocol access -> CIFS, iSCSI, NFS
Assign IP address -> Drop down and select without a subnet one page will prompt to enter IP, Subnet and DG
From port-> expend it and select though with physical interface you want to pass the traffic. Later you can migrate it.
Once you will configure you can't edit itiSCSI enabled SVM in NetApp ONTAP and mount to Windows and ESXI host
NetApp ONTAP LUN create step by step
NetApp ONTAP NFS volume and mount to ESXI host
NetApp ONTAP SVM create (NFS, CIFS, iSCSI protocol)
SME VMware and Window | VMware | VxRail | vSAN | SRM | vRO | vROP|VMware Aria Log Insight| Nutanix |Cisco HyperFlex | NetApp | Azure | Citrix | Veeam Backup & Replication, EM & One
NetApp ONTAP LUN create step by step
Login to ONTAP using cluster IP
Expend Storage
Click LUNs

Click Create


Give LUN Name
OS Type -> Select VMWare

Assign Size -> Next

Select an existing Volume or qtree for this LUN
Browse

Select Volume where you want or create LUN

Select Create a new flexible volume
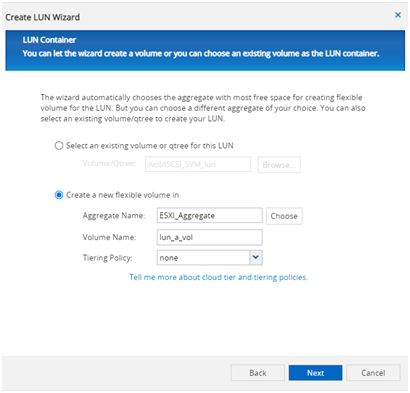
Aggregate Name -> Click choose and select Aggregate name
Volume Name -> Give Volume Name

Click Add Initiator group

Name -> Give Initiator group name
Operating System -> Drop down and select Operating system

Select the Supported protocol for this Group -> iSCSI

Select Initiator Group name give LUN ID -> Next

Check mark manage Storage quality of service if you want to configure
Here I am not configuring. -> Click Next


iSCSI enabled SVM in NetApp ONTAP and mount to Windows and ESXI host
NetApp ONTAP LUN create step by step
NetApp ONTAP NFS volume and mount to ESXI host
NetApp ONTAP SVM create (NFS, CIFS, iSCSI protocol)
SME VMware and Window | VMware | VxRail | vSAN | SRM | vRO | vROP|VMware Aria Log Insight| Nutanix |Cisco HyperFlex | NetApp | Azure | Citrix | Veeam Backup & Replication, EM & One
iSCSI enabled SVM in NetApp ONTAP and mount to Windows and ESXI host Steps
Login to ONTAP using cluster IP
Expend Storage -> Select SVMs

Click Create

Enter SVM Name
Data Protocol -> Select iSCSI
Security Style -> Drop down and select NTFS
Root Aggregate -> Drop down and select Aggregate

Under Data LIF configuration
Target Allias -> iSCSI host name
Before assigning host name create host record to reserve it with static IP
LUN Size -> Assign LUN size
Assign IP Address -> Without a subnet
One page will open separately to assign IP address
Host Initiator -> Assign iSCSI initiator
For Windows server below steps to capture iSCSI initiator details
Login to Server and search iSCSI Initiator
Click Configuration
Copy Initiator details from Initiator Name

Once Initiator details capture click Submit and Continue

Under SVM Administrator details
Enter Administrator Password
check mark Create a new LIF for SVM management
Assign IP Address drop down and select with subnet

Enter IP Address
Enter Netmask
Press OK

Now click Browse
Select Ethernet port -> OK
Click Submit and Continue


To check SVM configuration
Select SVM -> Setting
Select iSCSI -> check servce status
iSCSI service
iSCSI target alias
Now login to windows server
Open iSCSI initiator
Click Target -> Enter Target name (iSCSI server IP or Name)
Click quick connect
Now you can see Progress report
it showing Login Succeeded it means working fine.
SME VMware and Window | VMware | VxRail | vSAN | SRM | vRO | vROP|VMware Aria Log Insight| Nutanix |Cisco HyperFlex | NetApp | Azure | Citrix | Veeam Backup & Replication, EM & One
How to create NFS volume and mount to ESXI host
First you need to create LIF data using below link
Second need to create SVM with NFS enabled Protocol
you can use below link to create SVM with NFS enabled protocol
SVM CreateIn protocol you need to select NFS
In my LAB I have created SVM with below details and configuration
SVM Name-: ESXI_NFS
IP Address-: 192.168.1.75
Volume Name-: NFS_ESXI
Protocol-: NFS
Export policy-: Allowed ESXI host IP (192.168.1.101) in exprt policy
Steps to
create Volume for NFS SVM
Login to
NetApp ONTAP using cluster IP
Expend
Storage -> Select Volume
Select SVM
name for which you want to create volume
Note-:
please select NFS enabled SVM only if you want to create volume for NFS data.

Click create
-> Select FlexVol

Name -: Give
Volume Name
Aggregate ->
Choose correct Aggregate
Size -:
Assign volume size
Snapshot
reserve -: Give number of snapshot that you want to keep reserve
Space
Reserve -: Select thin/thick or keep it default
Now login to ESXI (root) or vCenter using Admin access.

Click new Datastore

Select Mount
NFS datastore -> Next

Name-: Give
Datastore Name
NFS Server-:
SVM server IP
NFS Share-:
NFS folder name
NFS
version-: select version

Click Finish

New Datastore has been mounted on ESXI host 192.168.1.101
SME VMware and Window | VMware | VxRail | vSAN | SRM | vRO | vROP|VMware Aria Log Insight| Nutanix |Cisco HyperFlex | NetApp | Azure | Citrix | Veeam Backup & Replication, EM & One
User account and assign Role in NetApp ONTAP
Login to ONTAP using cluster IP
Click settings

Select user from left


Enter UserName
Password
From User Login Methods
Application -> Drop down and select application type
Authentication ->
Role-> Drop down and select Role type
Click OK
 SME VMware and Window | VMware | VxRail | vSAN | SRM | vRO | vROP|VMware Aria Log Insight| Nutanix |Cisco HyperFlex | NetApp | Azure | Citrix | Veeam Backup & Replication, EM & One
How to add extra space on Aggregate in NetApp
Login to ONTAP using cluster IP
Expend Application & Tier -> Click Storage
Select Aggregate from list and open it


Click More Action -> Select Add Capacity
Note-: from here you can move volumes and Volume mirroring

Number of Disk-: drop down and select number of disk

Now you will see newly added space in disk.
SME VMware and Window | VMware | VxRail | vSAN | SRM | vRO | vROP|VMware Aria Log Insight| Nutanix |Cisco HyperFlex | NetApp | Azure | Citrix | Veeam Backup & Replication, EM & One
HPE MSA 2040 configuration Default IP range for HP SAN storage MSA 2040 is 10.0.0.1/2 You need to connect your laptop and storage with...


