What is Veeam Instant Recovery and step to recover VM using Instant Recovery


With Instant Recovery to VMware vSphere, you can immediately recover different workloads (VMs, EC2 instances, physical servers and so on) as VMware vSphere VMs. Instant Recovery to VMware vSphere can be helpful, for example, if you want to migrate your infrastructure from one environment to another, or you want to recover your infrastructure in a matter of minutes but with limited performance.

During recovery, Veeam Backup & Replication runs workloads directly from compressed and deduplicated backup files. This helps improve recovery time objectives (RTO), minimize disruption and downtime of production workloads. The workloads are recovered in a matter of minutes.

When you perform Instant Recovery, Veeam Backup & Replication mounts workload images to a host directly from backups stored on backup repositories. This means that Veeam Backup & Replication creates fully functioning “temporary spares” with limited I/O performance. To provide full I/O performance, you must migrate these "temporary spares" to the production site.


Steps to restore Cluster node using Instant Recovery

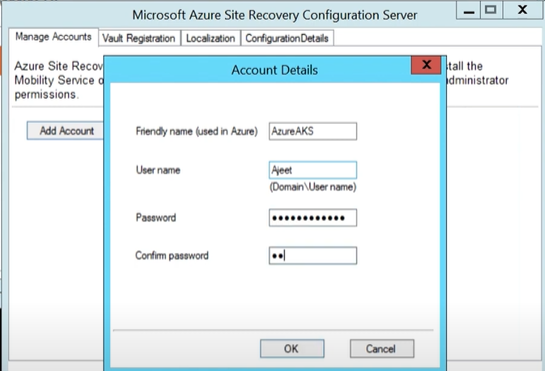
Login to Veeam Backup & Replication

Home -> Backups -> Disk
Select the job Name -> Right click Select Instant Recovery


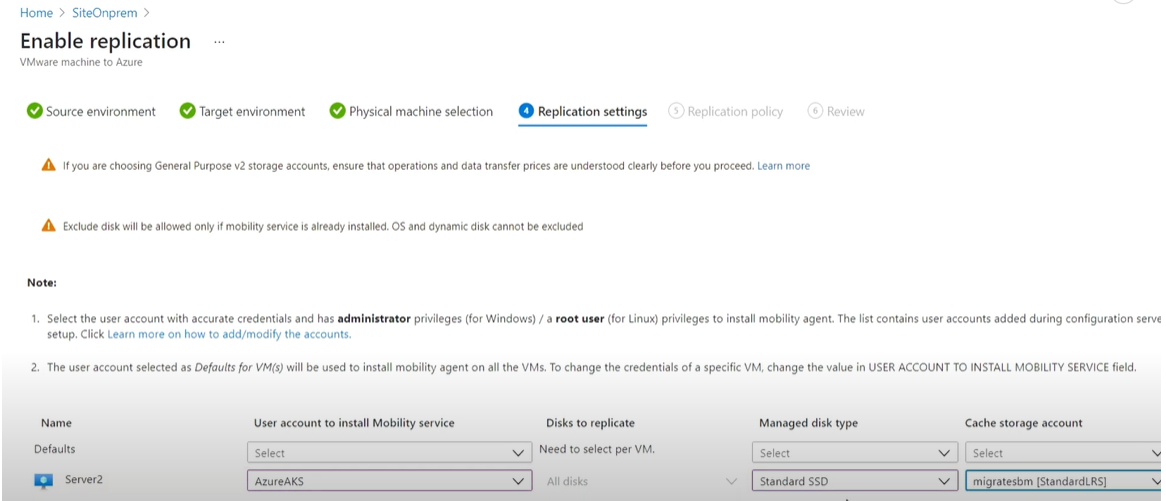
Change the Restored VM Name if you don’t want to overwrite.


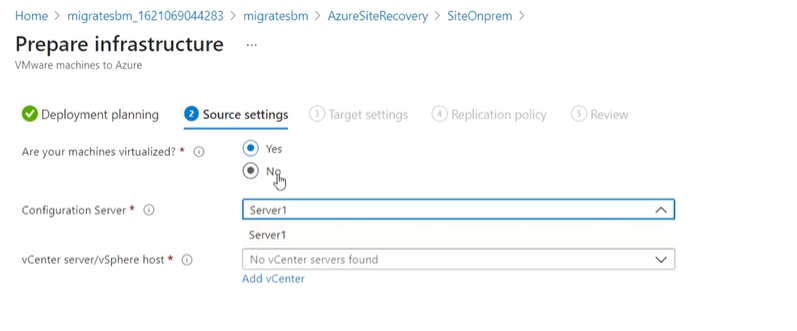
Host: Click choose to change host Name.


Select Network and click Choose.
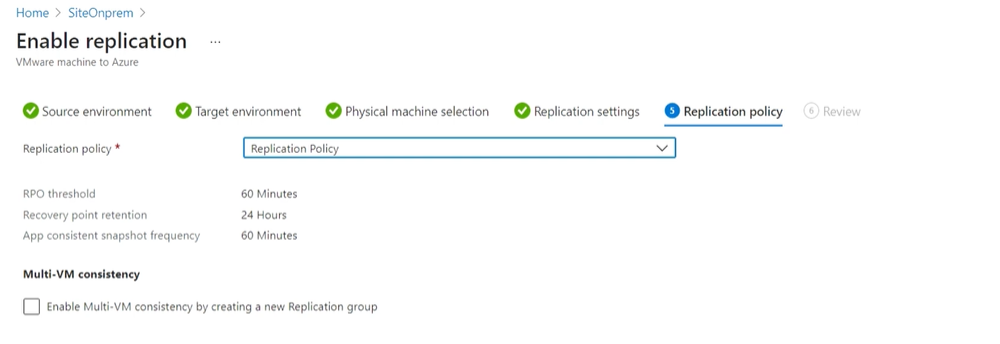


Click Next


Click Next


Click next


Don’t click on connect Network and Power On target VM once restore.


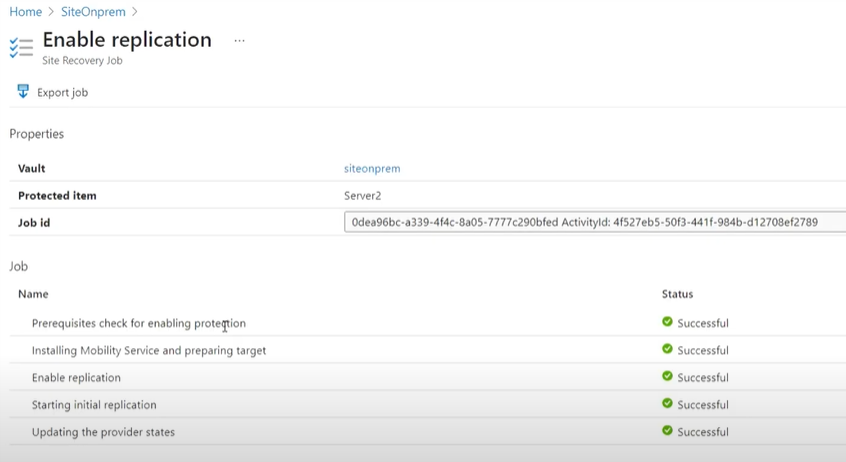
Once Restoration complete


Home -> Go to Instant Recovery -> Quick Migration

Follow the instruction and select the Host, Resource Pool, VM Folder and Datastore


Follow the instruction.


Click Next


Click Next


Select Delete source VM files upon successful quick migration and click Finish.


SFP and SFP+ full details with connectivity plan


An SFP (Small Form-factor Pluggable) port on a Cisco switch is a modular interface that allows for flexible connectivity options, particularly for fiber optic or copper networking connections.

  1. Physical Characteristics:
    1. SFP ports are small, modular interfaces located on the front panel of Cisco switches.
    2. They typically have a rectangular shape with a slot for inserting an SFP module or transceiver.
    3. SFP ports support hot-swappable functionality, allowing modules to be inserted or removed without powering down the switch.
  2. Flexibility:
    1. SFP ports offer flexibility in network connectivity by supporting a wide range of SFP modules or transceivers.
    2. They can accommodate various types of optical or copper cables, including multi-mode or single-mode fiber optics, and different Ethernet standards (e.g., 1Gbps, 10Gbps, etc.).
    3. SFP ports can be used for different networking technologies, such as Ethernet, Fibre Channel, or SONET/SDH.
  3. Module Compatibility:
    1. SFP ports are compatible with SFP modules or transceivers that match the desired network requirements (e.g., speed, distance, media type).
    2. Cisco offers a variety of SFP modules tailored to specific networking needs, including Gigabit Ethernet, 10 Gigabit Ethernet, and Fibre Channel.
  4. Configuration and Management:
    1. SFP ports are configured and managed through the Cisco switch's command-line interface (CLI) or graphical user interface (GUI).
    2. Administrators can configure port settings such as speed, duplex mode, VLAN membership, and other parameters to optimize network performance and reliability.
  5. Monitoring and Diagnostics:
    1. SFP ports provide monitoring and diagnostics capabilities to track port status, link status, and performance metrics.
    2. Administrators can use tools like Cisco's Embedded Event Manager (EEM) or Simple Network Management Protocol (SNMP) to monitor SFP port activity and detect any issues or abnormalities.
  6. High Availability and Redundancy:
    1. SFP ports support features like link aggregation (EtherChannel) and redundancy protocols (such as Spanning Tree Protocol) to enhance network reliability and availability.
    2. Multiple SFP ports can be aggregated together to increase bandwidth and provide failover capabilities in case of link failures.

Benefits of SFP & SFP+


SFP (Small Form-factor Pluggable) ports offer several benefits for network connectivity in various environments.

  1. Flexibility: SFP ports provide flexibility in network connectivity by supporting a wide range of SFP modules or transceivers. This allows for the use of different types of optical or copper cables, including multi-mode or single-mode fiber optics, and various Ethernet standards (e.g., 1Gbps, 10Gbps, etc.).

2. Modularity: SFP ports are modular interfaces that can accommodate hot-swappable SFP modules or transceivers. This modular design allows for easy replacement or upgrade of networking components without disrupting network operations or requiring downtime.

3. Scalability: SFP ports enable scalability in network design by allowing administrators to add or remove ports as needed to accommodate changing network requirements. This scalability makes SFP ports suitable for both small-scale and large-scale networking deployments.

4. Cost-Effectiveness: SFP ports offer cost-effective solutions for network connectivity by allowing administrators to choose the appropriate SFP modules or transceivers based on their specific networking needs. This flexibility helps optimize costs by avoiding the need for unnecessary hardware investments.

5. Interoperability: SFP ports facilitate interoperability between different networking devices and technologies by supporting industry standard SFP modules or transceivers. This interoperability allows for seamless integration of networking components from different vendors, enhancing flexibility and compatibility in network design.

6. High Performance: SFP ports support high-performance networking capabilities, including high-speed data transmission rates and low-latency communication. This makes them suitable for demanding applications and environments that require high bandwidth and reliable connectivity.

7. Space Savings: SFP ports have a small form-factor design that helps conserve space on networking devices, such as switches and routers. This space-saving design is particularly beneficial in environments with limited rack space or where compact networking equipment is preferred.

8. Future-Proofing: SFP ports provide a future-proofing mechanism for network infrastructure by supporting the latest advancements in networking technology. Administrators can easily upgrade SFP modules or transceivers to take advantage of new features or higher performance standards as they become available.


  1. Identify the SFP Port:
    1. Locate the SFP port on the Cisco switch. The SFP ports are typically located on the front panel of the switch and are often labeled with a port number and/or description.
  2. Prepare the Cable:
    1. Cable which is already plugged in ESX host (Validate on one ESX host(ESX01))
    2. Unplug the cable from the SAN Switch (One connectivity from ESX host)
    3. Ensure that the cable you intend to plug into the SFP port is compatible with the SFP module installed in the port. Verify that the cable connector matches the port type
  3. Remove the SFP Module Cover (if applicable):
    1. If there is a cover or dust cap protecting the SFP port, carefully remove it to expose the port(On Cisco Switch)
  4. Insert the Cable Connector:
    1. Align the cable connector with the SFP port and gently insert it into the port until it clicks into place. Ensure that the connector is inserted straight and evenly to avoid damaging the port or connector.
  5. Secure the Cable:
    1. Once the cable connector is fully inserted into the SFP port, secure it in place by tightening any locking mechanisms or screws on the connector, if applicable


What is vROPS and how to Check Network Utilization on Physical Interface using vROPS VMWare.

 What is vROPS and how to Check Network Utilization on Physical Interface using vROPS VMWare.

                                                         Or

Generate Physical Interface Network Utilized Report in VMWare using vROPS.


Login to vROPS


Click on Object Browser under Environment


Click integrated vCenter from Object browser -> Expend Select datacenter or cluster.


Click Metrics -> Click calendar and select the date & time range


Click Metrics > Expend it


Click Network -> Physical and click on Usage Rate


In the right-side next page, you will see usage in graph


vTPM Windows 11 installation in VMware step by step


What is a vTPM? A virtual Trusted Platform Module (vTPM) as implemented in VMware vSphere is a virtual version of a physical TPM 2.0 chip, implemented using VM Encryption. It offers the same functionality as a physical TPM but is used within virtual machines (VMs).


Deployment of vTPM modules, require a Key Provider on the vCenter Server.
For more information on vTPM modules.

In order to deploy vTPM modules (and VM encryption, vSAN Encryption) on VMware vSphere ESXi, you need to configure a Key Provider on your vCenter Server.

Traditionally, this would be accomplished with a Standard Key Provider utilizing a Key Management Server (KMS), however this required a 3rd party KMS server and is what I would consider a complex deployment.

VMware has made this easy as of vSphere 7 Update 2 (7U2), with the Native Key Provider (NKP) on the vCenter Server.

The Native Key Provider, allows you to easily deploy technologies such as vTPM modules, VM encryption, vSAN encryption, and the best part is, it’s all built in to vCenter Server.


Enabling VMware Native Key Provider (NKP)

To enable NKP across your vSphere infrastructure:

->Log on to your vCenter Server
->Select your vCenter Server from the Inventory List
->Select “Key Providers”
->Click on “Add”, and select “Add Native Key Provider”
->Give the new NKP a friendly name
->De-select “Use key provider only with TPM protected ESXi hosts” to allow your ESXi hosts       without a TPM to be able to use the native key provider.

In order to activate your new native key provider, you need to click on “Backup” to make sure you have it backed up. Keep this backup in a safe place. After the backup is complete, you NKP will be active and usable by your ESXi hosts.


https://www.starwindsoftware.com/blog/windows-11-tpm-and-encryption-in-vmware-vsphere

Windows Deployment Services Encountered an error: Error Code 0x0000001

If you are getting below error while deploying OS using SCCM PXE deployment and your SCCM DP and DHCP roles are installed in different-different machine.


Make sure you have already configured IP helper in core switch against all the vLAN/Scope subnets.
Make sure you have configured 066 Boot Server Host Name TFTP (SCCM DP server IP you need to add here) in DHCP Server Option.

What is new in VxRail 8.0.201 | VxRail 8.0 upgrade plan


What is new in VxRail 8.0.201


VxRail 8.0.201 includes the VMware vCenter Server 8.0 Update 2a (same as VxRail 8.0.200), VMware ESXi 8.0 Update 2 (same as VxRail 8.0.200), updated BIOS for hardware models V670F, P670F/N, E660/F/N, S670, and other security fixes.

For more information, see VMware vCenter Server 8.0 Update 2a Release Notes and VMware ESXi 8.0 Update 2 Release Notes.

Security fixes:

VxRail 8.0.201 contains fixes that resolve multiple security vulnerabilities. For more information, see the following Dell Security Advisory (DSA):

DSA-2023-465: Dell VxRail Security Update for multiple third-party component vulnerabilities which address:

       PowerEdge: Intel November 2023 Security Advisory (2023.4 IPU) (CVE-2023-23583)

VxRail Manager: SUSE


VxRail 8.0.201 Package Software

This section lists the components of the VxRail 8.0.201 software package.

VxRail Software

       VxRail Manager 8.0.201 build 28354420

       VxRail System 8.0.201 build 28354422

       VxRail Manager VMware vCenter Plugin 9.3.0.0

VMware integration

       VMware ESXi 8.0 Update 2 build 22380479

       VMware vCenter Server Appliance 8.0 Update 2a build 22617221

       VMware vSAN 8.0 Update 2 build 22380479

PowerEdge platform components

       BIOS: 1.12.1

       iDRAC: 7.00.30.00

       iSM: 5.2.0.0.3156


NSX Compatibility


On-Prem VM migrate to Azure Step by Step

 You need to consider below points before planning to migrate On-Prem VM to cloud.

1.       Azure Subscription

2.       Which region do you need to migrate.

3.       Where are my users?

4.       Are there any Govt regulations requirements?

5.       Cost effective region?

6.       Network latency to the existing datacenter / users?

7.       Why do I need to migrate to Azure?


What options are available to migrate these applications/servers to Azure Cloud.


1.       Option 1

a.       Create a new VM in Azure.

b.       Deploy the Applications.

c.       Take the backup of the application on the prem.

d.       Restore the backup on the Azure VM.

e.       Verify the Application

f.        Update the DNS record.

Advantages –

a.       Fresh installation / clean installation.

b.       Easy to migrate.

c.       Amount of data transfer from On-prem to Azure is very less.

Disadvantages –

a.       It is not the same environment.

b.       Patches are missing.

c.       Application Patches are missing.

d.       O/S configurations are missing.

e.       User experience is very bad.


2.       Option 2

a.       As it is – migration.

b.       Entire state of the server /VM /Application is migrated to the target (Cloud)

On-Prem: Hardware sizes might be oversized.

VM is running at low performance.

1)      What VM’s are running

2)      What O/S is running

3)      Cost Associated

4)      What is H/W utilization details.

5)      Cost of the VM

6)      Allocating proper resources

7)      Choosing the right VM – proper processor and memory

8)      What applications are running.

9)      What network ports are allowed to communicate


Create Recovery Service vaults

Select Resource group

Instance details

Give vault name


Create vNet


Create Storage Account


Now go to site Recovery and select the product platform that you are going to migrate.

I am selecting VMware machine to Azure because my On-Prem VM is running on VMware workstation.

Under VMware machines to Azure -> Prepare Insfrastructure

Deployment planning completed -> Drop down and select I will do it later


Configuration server-> Add configuration Server


Now account has been created


Now ping and run the telnet using port 135 to check connectivity between source and destination.

If communication is fine between source and destination proceed for infrastructure configuration.

Configuration server -> dropdown and select the infrastructure

Post-failover deployment model ->  Drop down and select either classic or Resource Manager

I am selecting resource manager

If you have already created Replication policy -> Drop down and select the replication policy else click on Create new policy and associate

As I hadn’t pre-created Replication policy so I am creating new policy. 

Now Replication policy is creating.


Now

Now click Review and create


Now Infrastructure is ready click Enable Replication


Drop down configuration server -> Select the configuration server

Machine type -> Virtual machine 


Now add the source server

Name -: Server name

IP address-: Enter IP address

OS type-: Drop down and select OS window


Featured Post

HPE MSA 2040 configuration step by step

HPE MSA 2040 configuration Default IP range for HP SAN storage MSA 2040 is 10.0.0.1/2 You need to connect your laptop and storage with...